Search This Blog

Pages

Thursday, March 10, 2022

HAM AND SWISS QUICHE

 I've been making this quiche recipe for years, and have never taken the time to share it.  Since I just made it again for a family brunch, I made it a point to take some pictures so I can show you how it looks, as well as share the recipe.

It comes together fairly easily ...... I use a frozen 9 inch deep dish pie shell.  So, there's just a little prep to shred the cheese, and/or dice the ham.  

INGREDIENTS:

(1) 9 inch deep dish frozen pie shell
3 large eggs
1 can evaporated milk
2 Tbsp. flour
1 cup diced ham
1 cup shredded swiss cheese
2 Tbsp. diced onion
1/4 tsp. pepper
1/4 tsp. garlic powder
1/4 cup chopped spinach (optional)

DIRECTIONS:

Pre-heat oven to 350 degrees.  

Prepare ingredients by shredding the cheese, dicing the onion, and chopping the spinach.   Place ham, and cheese into a bowl and sprinkle with flour.

In a separate bowl, whisk together eggs, milk, pepper and garlic powder . 

Place the ham and cheese (reserving 1/4 cup of cheese) into the pie shell.  Sprinkle onion and spinach on top.  

Place the quiche on a foil lined cookie sheet and pour all of the milk/egg mixture over the top.  Add the remaining 1/4 cup of cheese.

Bake 45-50 minutes.   Cool on wire rack approximately 10 minutes to set before serving. 

Enjoy!

Monday, February 7, 2022

BRIDAL ROBE

 One of the details I really wanted to be a part of for my daughter's wedding was to create a bridal robe for the morning of her wedding day.   I visualized something very unique and sought my inspiration from "Old Hollywood".  Specifically the '40s.  At that time, robes were often referred to as dressing gowns or peignoirs, and they were "dreamy". 

It's actually two pieces.  A satin nightgown underneath a chiffon robe. 

The picture on the right shows the nightgown itself.  It's very loose fitting with a low back that allowed her to step into and out of it, since I knew her hair and makeup would be done while she was wearing it.  I cut the lower panel on the opposite grain of the top portion to highlight the sheen of the satin.  
                      
Below are some pictures of the chiffon robe in various stages of completion.  As well as the Rita Hayworth inspiration.  It has a wide "cumberbund" style waistband made of satin to match the nightgown.  The chiffon of the robe, created a beautiful drape, just as I had hoped.   I left the back extra long to resemble the train of a wedding gown.   The extra full sleeves were super fun.  My daughter said they were "wizard sleeves".  
            

I'm so pleased with the way that it turned out!  My daughter looked gorgeous, and I know she felt extra special, just like a bride should on her wedding day.  

Thursday, January 27, 2022

WEDDING MENU

 My daughter's wedding was a very intimate event, with just twelve family members witnessing and celebrating with them.  The day itself was absolutely gorgeous.  Cold, crisp and sunny.  It had snowed the day before, so there was a beautiful skim coat of snow on the ground and flocking on the evergreens.

The intimate ceremony was followed by a lovely dinner.  Close friends of the bride and groom just also happen to include event planning expertise and a chef.   A delicious menu was developed by Chef Joe.  Three absolutely scrumptious appetizers, followed by an equally delicious main course.  It was bliss.

I decided I needed to make a menu so that the guests could see exactly what Joe had prepared and also to provide a keepsake for the Bride and Groom to remember this amazing dining experience they had on their wedding night. 

I had already had a gold foil theme going with the placecards, so I had to include some gold foil.  I mounted the finished menu on black cardstock since we used black tablecloths and chair covers.  Other touches included, clear acrylic chargers with gold edges, and the china was ivory with a gold border.  It was so elegant!

My original intent was to gold foil the monogram that I had placed on the menu, however I realized my one hour of gold foil experience with the placecards wasn't going to cut it.  I have a lot more to learn on the technique before I can master the intricacies of a monogram (my practice run, proved that).  So, I opted for the "abstract" look I had put on the namecards. 

I made the actual menu with the use of my silhouette software, then printed it out, gold foiled the edges and mounted it on the cardstock.   That evening, I placed it on an easel alongside the bridal bouquet where Chef Joe was serving the appetizers.    It was a magical evening and turned out exactly as my daughter had visualized it.....so that makes this Mother of the Bride, very happy.                                                                                                   

Monday, January 3, 2022

COWBOY BEEF DIP

 I was looking for a hot dip recipe for Christmas Eve and landed on this one....and boy, I'm glad I did!  It has a great flavor---but be forewarned, once you start you can't stop eating it.  I literally had to wrap it up and put it in the fridge because none of us could stop eating it and I was afraid we wouldn't have room for dinner.

My advice, make it for a day of "grazing", a snowy day, the superbowl, a cocktail party.  


INGREDIENTS:

1 pound ground beef
4 Tbsp. chopped onion
2 Tbsp. chopped red pepper
2 Tbsp. chopped green pepper
4 Tbsp. sliced black olives
4 Tbsp. sliced green olives with pimento
*1 can (10 3/4 oz) nacho cheese soup, undiluted
2 Tbsp. chopped green chiles
1/4 tsp. pepper
1/4 tsp. dried oregano
1/4 cup shredded cheddar cheese
1/2 cup salsa
2 Tbsp. sour cream
2-3 Tbsp. chopped fresh parsley

*I could not find nacho cheese soup, so I substituted cheddar cheese soup

DIRECTIONS:

In a skillet cook the beef, 3 Tbsp. onion, 2 Tbsp. red pepper, and 1 Tbsp. green pepper over medium heat until the beef is browned.  Drain if necessary.  Stir in the soup, salsa, 3 Tbsp. of each of the olives, chiles, jalapeno, oregano and pepper.  Bring to a boil.   Reduce heat and simmer uncovered for 5 minutes.

Transfer to a serving dish and top with shredded cheddar cheese, sour cream and parsley.  Sprinkle with the  remaining, green pepper, black olives and green olives.  Serve with tortilla chips

Enjoy!

Recipe c/o:  www.tasteofhome.com

Friday, December 31, 2021

HOLLYDAY MINT PIE

 I first tried this recipe several years ago and the family unanimously titled it "a keeper".  So, with a different mix of family at this gathering, I decided it was time for an encore. 

It comes together very quickly.  Just be sure to give yourself enough time for it to set in the fridge before serving (3 hours).

INGREDIENTS:

*16 Keebler Fudge Shop Grasshopper Cookies
1 ready made graham cracker pie crust
3 Tbsp. hot water
4 oz. softened cream cheese
1/3 cup sugar
2 Tbsp. milk
1/4 tsp. peppermint extract
1 tub (8 oz.) non dairy whipped topping, thawed
8 drops green food coloring
Red hot cinnamon candies
Spearmint leaf candies

*I was unable to find the Keebler brand, so I substituted a bargain brand chocolate sandwich cookie with mint filling

DIRECTIONS:

Crush cookies in a small bowl, add the hot water to dissolve and spread into the bottom of the crust.

Beat cream cheese on medium speed of an electric mixer until fluffy,  add sugar, milk and extract.  Beat until thoroughly mixed,  Fold in whipped topping.

Divide mixture in half.  Add the green food coloring to half.  Spoon alternating dollops of white and green over the cookie layer crust.  

Refrigerate for three hours or until set.  Garnish.

Enjoy!


P.S.  Don't just think this is a holiday pie,  Remove the "holiday garnish" and replace with chocolate drizzle, or Andes Mint chocolates and serve it anytime!

Friday, December 24, 2021

FRENCH ONION SOUP

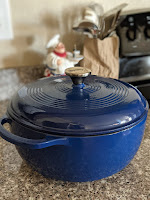
 I recently gifted myself a dutch oven.  After seeing so many awesome recipes that can be made in one, I decided it was time.  I had my husband do all the research on the various brands, their reviews, the price points, etc., etc., and then I made the purchase.  I knew exactly what my first recipe was going to be.....French Onion Soup.  I had saved the recipe from America's Test Kitchen and couldn't wait to give it a try!

Man, oh Man!  It did not disappoint.  I had some family over and everyone loved it.  I think I was making groaning noises as I was eating it.  It was that good.

There are several steps, but the majority of the work is done in the oven, so it really wasn't all that bad. 

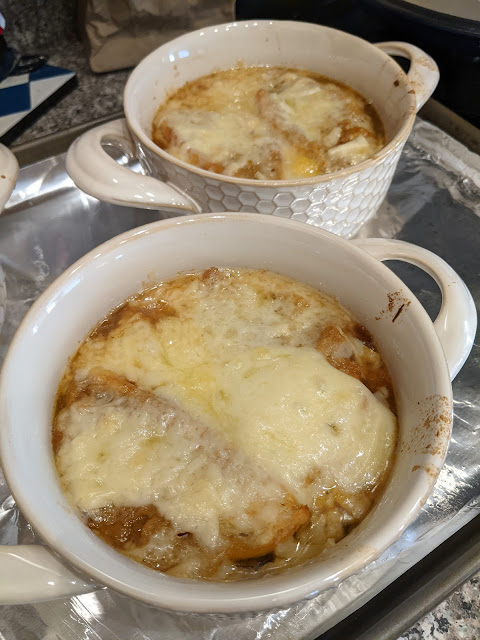
Are you drooling yet?  This picture is straight out of the oven.  Look at all that melted gruyere cheese.

INGREDIENTS:

SOUP
3 Tbsp unsalted butter, cut into 3 pieces
6 large yellow onion (about 4 pounds) halved and cut pole to pole 1/4" thick pieces
table salt
2 cups water, plus extra for deglazing
½ cup dry sherry
4 cups low-sodium chicken broth (Swanson chicken stock)
2 cups beef broth (Rachael Ray Stock-in-a-box made by Colavita)*
6 springs fresh thyme, tied with kitchen twine
1 bay leaf
ground black pepper


CHEESE CROUTONS
1 small baguette, cut into 1/2 inch slices
8 oz. shredded Gruyere cheese (about 2 ½ cups)


DIRECTIONS:

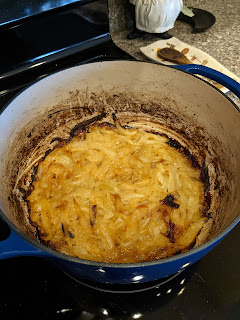
Adjust oven rack to lower middle position and heat oven to 400 degrees.  Generously spray inside of (at least 7 quart) Dutch oven with non-stick spray.  Place butter in pot and add onions and 1 tsp salt.  Cook, covered 1 hour (onions will be moist and slightly reduced in volume).  Remove pot from oven and stir onions, scraping bottom and sides of pot.  Return pot to oven with lid slightly ajar and continue to cook until onions are very soft and golden brown, 1.5 - 1.75 hours longer, stirring onions and scraping bottom and sides of pot after 1 hour.  
Carefully remove pot from oven and place over medium high heat.  Using oven mitts to handle pot, cook onions, stirring frequently, until pot bottom is coated with dark crust, 6-8 minutes, adjusting heat as necessary.  (Scrape any fond that collects on spoon back into onions).  Stir in 1/4 cup water, scraping pot bottom to loosen crust, and cook until water evaporates and pot bottom has formed another dark crust, 6-8 minutes.  Repeat process of deglazing 2-3 more times, until onions are very dark brown.  Stir in sherry and cook, stirring frequently, until sherry evaporates, about 5 minutes. 

Stir in broths, 2 cups water, thyme, bay leaf, and 1/2 tsp. salt, scraping up any final bits of browned crust on bottom and sides of pot.  Increase heat to high and bring to simmer.  Reduce heat to low, cover, and simmer 30 minutes.  Remove and discard herbs, then season with salt and pepper.

While soup simmers, arrange baguette slices in single layer on baking sheet and bake about 10 minutes in a 400 degree oven  until bread is dry, crisp, and golden at edges.  

To serve:  Adjust oven rack six inches brom broiler element and heat broiler.  Set individual broiler-safe crocks on baking sheet and fill each with about 1 3/4 cups of soup.  Top each bowl with 1 or 2 baguette slices (do not overlap slices) and sprinkle evenly with Gruyere.  Broil until cheese is melted and bubbly around the edges, 3-5 minutes.  Let cool 5 minutes.  

*I was unable to find the recommended beef stock, I used the Swanson brand.

Notes:
-Sweet onions, such as Vidalia or Walla Walla, will make this recipe overly sweet
- Be patient when caramelizing the onions in step 2; the entire process takes 45-60 minutes
-If you don't have broiler safe crocks, sprinkle the toasted bread slices with Gruyere and return them to the broiler until the cheese melts and float them on top of the soup
-For the best flavor, make the soup a day or two in advance.  Alternatively, the onions can be prepared through step one, cooled in the pot, and refrigerated for up to 3 days before proceeding with the recipe
 

Saturday, December 4, 2021

ROASTED VEGGIES

I'm so pleased that I finally landed on an approach to veggies that is super easy, as well as yummy.  I literally roast a big batch of veggies once a week and then work on the leftovers at least one other day.  I'm going to share my approach, but I don't have any measurements on this one.  You can start with my preferences and then modify until you learn what you like best. 

The other great thing about roasting veggies, is you can mix it up.  I've yet to taste a roasted veggie that I didn't like.  The picture above has broccoli, cauliflower, sweet potatoes, and yukon gold potatoes. I love fresh green beans too!

The most important thing is considering the cook times of the different veggies, so the entire dish is perfectly done.  So, referring back to to this combination, I put the potatoes down the center of the foil wrapped cookie sheet (leaving room on both sides) and put them in a 425 degree oven for about 40 minutes.  Then, I take them out and add the cauliflower and broccoli and cook for 20 more minutes. 

INGREDIENTS:

Your choice of veggie combinations, or veggie and potatoes. 
1 large plastic freezer bag
canola oil
pepper
kosher salt
rosemary
tarragon
paprika
onion salt


DIRECTIONS:

Pre-heat oven to 400 degrees 

1.  Prepare veggies and/or potatoes cutting them up into similar sizes so they cook consistently.  I usually shoot for bite size.  If you go too small they'll definitely overcook.
2.  Add the vegetables that need longer to cook (carrots, potatoes) to a large freezer bag.  Pour oil into the bag (approximately 2 Tbsp.)  and shake to ensure they are coated well with oil, add more if necessary.
3.  Shake the spices into the bag ( I usually mix them up in a small dish and then pour them into the bag all at once).  For a baking sheet this size, I'm probably using about ½ tsp. of each.  
4.  Empty the bag onto the pan and bake.


Notes:  
  • Potatoes or carrots need a total of 60 minutes, so I put them in 40 minutes ahead of other veggies.
  • Most other veggies take about 20 minutes.  I'll use the same freezer bag to oil and season them.
  • Using these timeframes, there will be a bit of char on everything....which I love!  You can always learn your preferences on the spice level and cooking times after a couple of attempts.
My husband has become a sweet potatoe fan now that he's had them this way.  He used to detest them since the only way he ever had them was in the traditional sweet potatoe casserole smothered in butter, brown sugar and marshmallows. 

Enjoy!