Search This Blog

Pages

Saturday, December 3, 2022

CHOCOLATE MALT ICE CREAM CAKE

 I've always enjoyed a good ice cream cake.  In my hunt for a recipe, I ran across this recipe which used malted milk balls.  Whoa!  Gotta try this one. 

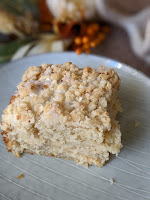
I apologize in advance for this being the only picture I captured.  I wish I would have taken one of the entire cake, because it was super pretty. 

The picture on the right is from the Betty Crocker website, which is where I found this recipe. 

It is a delicious recipe.  Know that it makes a lot....and it's very rich. So it will go a long way!  Also, there are several steps requiring freezing, so be sure to allot enough prep time.  


INGREDIENTS:

1 ½ cups all purpose flour
1 cup sugar
¼ cup unsweetened baking cocoa
½ tsp. salt
1 tsp. baking soda
1 cup water
1/3 cup vegetable oil
1 tsp. white vinegar
1 tsp. vanilla
1 cup chocolate fudge topping
1 ½ cups (6 cups) vanilla ice cream softened
2 cups malted milk ball candies, coarsely chopped
1 cup heavy whipping cream
¼ cup chocolate fudge topping

DIRECTIONS:

Heat oven to 350 degrees.  Grease bottom of springform pan, 9x3, or 10 x 2 3/4 inches with shortening, lightly flour.  In large bowl, mix flour, sugar, cocoa, baking soda,  and salt.  Add water, oil, vinegar and vanilla.  Stir vigorously about 1 minute or until well blended.  Immediately pour into pan. 

Bake *30-35 minutes or until toothpick comes out clean.  Cool completely, approximately one hour. 

Spread 1 cup fudge topping over cake; freeze about 1 hour or until topping is firm.  In large bowl, mix ice cream and chopped candies; spread over cake.  Freeze about 4 hours or until ice cream is firm. 

In chilled medium bowl, beat whipping cream with electirc mixer on high speed until stiff peaks form. 

Remove side of pan; place cake on serving plate.  Top with whipped cream.  Melt 1/4 cup fudge topping; drizzle over whipped cream.  Garnish with additional candies. 

Enjoy!

Note:  *My cake only took about 22 minutes.  

Recipe c/o  www.bettycrocker.com

Sunday, October 30, 2022

HIGH ALTITUDE ALMOND COFFEE CAKE

My daughter and I fell in love with the most scrumptious almond filled croissant in Los Angeles last year and I've been on a mission to continue looking/enjoying them as I find them.   The version we had in Vermont, just wasn't the same...it had almond flavor, but also apple in it.    

In the meantime, I stumbled across an Almond Coffee Cake recipe that included an almond filling, so I thought I'd give it a try.  I knew it wasn't going to have the flaky pastry on top, but the almond filling and struesel caught my attention.  Plus, the recipe was already adjusted for high altitude baking!

INGREDIENTS:

COFFEE CAKE
3/4 cup sugar
6 Tbsp. unsalted butter, melted
2 large eggs
3/4 cup sour cream
3/4 cup whole milk
1 tsp. vanilla extract
1 ½ tsp. almond extract
2 Tbsp. cornstarch
1 3/4 cups all purpose flour
1 ½ tsp. baking powder
¼ tsp. baking soda
¼ tsp. coarse kosher salt (if using table salt, use half the amount)
¼ tsp. ground nutmeg
¼ tsp. ground cloves

FILLING
4 oz. cream cheese, softened to room temp
4 oz. almond paste (not almond pastry filling)

STREUSEL
1/3 cup sugar
½ cup all purpose flour
½ tsp coarse kosher salt (if using table salt, use half the amount)
3 Tbsp. unsalted butter, melted
¼ cup almonds, finely chopped (or ¼ cup almond flour)

ICING
1 cup powdered sugar
¼ cup heavy whipping cream (I used whole milk)
½ tsp. almond extract

DIRECTIONS:

Preheat the oven to 350 degrees and spray a 10 inch square baking pan with non-stick spray.  In a bowl, whisk together the sugar, melted butter, eggs, sour cream, milk, vanilla, and almond extracts.  In a separate bowl, sift together the flour, cornstarch, baking powder, baking soda, salt, nutmeg and cloves.  Add the dry ingredients to the wet, and whisk briefly just to combine.  Set aside while you make the filling.

FILLING
With an electric mixer, beat the cream cheese and almond paste for about 30 seconds until combined.  Spread half the coffee cake batter into the bottom of the prepared pan.  Spoon the filling over the batter, then use a small icing spatula to spread the filling out.  Spread the remainder of the batter over the filling.

STRUESEL
In a bowl, combine the sugar, flour, salt and melted butter until moistened and crumbly.  Stir in the almonds, reserving 1-2 Tbsp. to sprinkle over the icing later if you'd like).  Sprinkle the struesel over the batter. 

Bake the cake on the center oven rack for about 45-50 minutes, or until the edges are golden brown and a cake tester inserted in the center comes out clean.  Set aside to cool while you make the icing.

ICING
In a bowl, stir together the powdered sugar, cream and almond extract until smooth and has a thick drizzling consistency.  Drizzle over the hot cake and sprinkle with the remaining chopped almonds.  Let cool 20-30 minutes.  


NOTES:  I had an 8x8 and a 9x9 square pan.  I opted to use the 9x9 pan and made a parchment sling to ensure I could get it out of the pan nicely.  I did not need to adjust the baking time, and the cake plumped up nicely.  

I didn't make as much icing as it called for and I waited until it had cooled some before I drizzled it so it wouldn't melt into the cake.

I thoroughly enjoyed this coffee cake.  It has a great almond flavor.

Enjoy!


recipe c/o:  www.curlygirlkitchen.com


Thursday, October 13, 2022

FALL IN NEW ENGLAND

Spending some time in New England in the Fall has always been on the proverbial list.  I've never been to that part of the country and from the pictures I'd seen over the years, I knew it would be memorable....especially for a gal whose favorite season is Fall.

For those who know me, I do A LOT of research prior to my travel.  Not knowing when I may return, I try to make my trips a totally immersive experience and take in as much as I can.   It also makes it extra special when it's our annual Mother/Daughter vacation.  

I knew Fall color in that part of the country is later than here in Colorado, so I landed on September 26-October 5.  As it turned out, Mother Nature did a fantastic job of showing off for us!

Here's the itinerary I developed: 
  • Day 1 - Fly from Denver to Boston
  • Day 2 - Explore Salem, then drive to Lincoln, New Hampshire
  • Day 3 - Scenic drive to Manchester, Vermont
  • Day 4 - Scenic drive to Stowe, Vermont (stay 3 nights....day trips)
  • Day 5 - Scenic drive to Burlington, Vermont and Shelburne Farms
  • Day 6 - Scenic drive around Stowe/Mt. Mansfield/covered bridges
  • Day 7 - Scenic drive Stowe, Vermont to North Woodstock, New Hampshire
  • Day 8 - Scenic drive via the Kancamangus highway to Kennebunkport, Maine
  • Day 9 - Scenic drive via Coastal Route 1 to Boston
  • Day 10 - Fly Boston to Denver  
FYI- My scenic drives have multiple stops along the way                       


Must See's:
Salem (self-guided historical walking tour)
Montpelier State House
Hildene- Lincoln Home
Echo Lake
Woodstock, VT
Vermont Country Store
Granville Gulf Reservation State Forest
Flume Gorge (trip highlight)
Shelburne Farms, Shelburne winery
Ben and Jerry's 
Von Trapp Bierhall and Brewery
Mt. Mansfield 
Covered bridges (so many between New Hampshire and VT.....I narrowed it down to five in Stowe)
Cafe' Lafayette dinner train (trip highlight-it's a splurge)
Driving the Kancamangus Hwy
Rockport, New Hampshire

Skip It:
(we did all these and would skip them based upon our experience)
Salem Witch Museum
Burlington, VT
Gondola ride at Mt. Mansfield in Stowe

Disappointment;
Kennebunkport, Maine (many stores/restaurants were closed...bus loads of people being dropped off)
Stowe (as a place to stay....find lodging elsewhere...DEFINITELY do a day trip to the area)                                                                                       

We learned the hard way that many restaurants close at 2 or 3p.   Most of the lodges/inns I booked provided some type of breakfast.  So we'd eat and take off on the scenic ride I had planned for the day....then, by the time we finished it would be mid-afternoon and we had a hard time finding somewhere to have lunch.  No fun being hangry on vacation.  TIP- Do a little research...and pack some snacks in the car.  

Kennebunkport was a disappointment as I shared....but the seafood was amazing.  We split a lobster roll and each had a cup of clam chowder from the one restaurant we found open for lunch.   We chose to go back to the same place (Mabel's) for dinner and split lobster mac and cheese and crab cakes.  Both meals were delicious!

We drove a total of 1,361 miles on this trip, and were mesmerized by the color.  I love Fall in Colorado, don't get me wrong...but the east coast Fall is completely different and you just have to experience it to understand what I mean.  

I did well with the lodges/inns I booked in Vermont and New Hampshire...they were pricey, but I expected that based upon the time of year.   The two worst hotels were those I booked in the Boston area on the outbound and return.   The meals prices caught me completely off guard...but dining out everywhere right now is crazy.  

We both enjoyed New Hampshire more than Vermont surprisingly....it was a little quainter, quieter, and the scenery was better, probably because of the terrain.  It's very hilly, and the drives through the state were breathtaking!                                                                                                                                        

The 2023 Mother/Daughter trip is seven months from now.  Flights and hotels are booked and I've already got a pretty well planned itinerary.  Can't come soon enough for me!


Tuesday, September 20, 2022

SMOKED GOUDA, APPLE AND HAM GRILLED CHEESE

 Sometimes you just need an easy dinner idea, loaded with lots of flavor.  Here's an "adult" grilled cheese that I came up with that you may find as enjoyable as I did.

This recipe will make two sandwiches. 

INGREDIENTS:

4 slices sourdough bread
Dijon mustard
Miracle Whip
Honey
4 slices deli style ham slices
1 Granny Smith apple
3 oz. Smoked Gouda
Real Bacon Bits


DIRECTIONS:

Butter one side of each slice of bread.    Slice the Granny Smith apple into very thin slices.  Grate the cheese. 

On one of the unbuttered sides of bread,  add a skim coat of Dijon, top with a skim coat of Miracle Whip (or mayo) and finally a drizzle of honey.

Add two slices of deli ham on top of the condiments, layer on top the apple slices to cover the ham.  Pile a generous amount of the grated cheese on top of the meat and finally shake on some bacon bits. 

Top with the second slice of bread, butter side up.  

Add the sandwich to a heated skillet and brown on both sides until toasty and golden.  

Enjoy!!


Thursday, September 8, 2022

BAKED PENNE WITH PROSCIUTTO AND FONTINA

I'm always looking for unique pasta recipes, so this one caught my eye.  I rarely use Prosciutto and I don't remember every using Fontina cheese.....so, this one hit all the marks for me.  It was absolutely scrumptious!

I used mini casseroles per the recipe, which was fun, but I would opt for one large casserole next time. 

INGREDIENTS:

10 oz. penne pasta
1/4 tsp. kosher salt plus extra for salting the water
3 oz. thinly sliced prosciutto, torn into 1 inch pieces
3 oz. coarsely grated Italian Fontina cheese
1.5 oz. finely grated Parmigiano-Reggiano
1.5 cups heavy cream
3/4 cup fire roasted diced tomatoes
1/2 cup chicken broth
2 tsps. minced garlic
2 tsps. dried rosemary or 1 Tbsp. plus 1 tsp. fresh minced
1-2 tsp. hot pepper flakes (optional)
3 Tbsp. butter, cut into thin slices


DIRECTIONS:

Cook pasta to the Al dente stage.  Drain the pasta.  

Spray a large casserole dish with a non-stick spray.  

Pre-heat the oven to 350 degrees.

With the exception of the butter, combine all the ingredients into a large bowl.  Add the pasta to the bowl and combine well.  Arrange the butter slices over the top of the casserole dish.  Bake the pasta until bubbly and brown.  Approximately 25-30 minutes.  Let stand 5 minutes before serving.

What a wonderful flavor!  I hope you enjoy it as much as we did.  


NOTES: 
You'll find the original recipe at www.saramoulton.com if you'd like to see the original.  This is my adaptation, after having made it exactly per her recipe.   I don't know if the high altitude played a factor, but her process of just letting the pasta soak prior to cooking resulted in very chewy pasta.  I actually had to put my dishes back in the oven to cook longer.  That's why I'm recommending cooking to the Al dente stage, prior to assembling.  I also lowered the cooking temp and increased the cooking time.


Tuesday, August 2, 2022

GOLDEN BIRTHDAY DRESS

 I just recently learned what a "golden birthday" is, and promptly went into creative mode when I learned that my daughter was hoping I could make her a dress for her golden birthday.  She had told me she wanted a gold dress, and sent me some pictures of dresses that were loaded with all sorts of "bling".  

Now that I knew what she was looking for, she went to work purchasing all sorts of jewels, chains, etc., and I went to work looking for some flashy gold fabrics....sequins, laces, etc. 

The whole project was very different than how I usually work......first thing, my daughter kept stressing that this dress was strictly for her birthday.  Because of that, the approach I/we used was very foreign.  I normally would have made a pattern, working hard on the fit....Constructed it the way I usually would a strapless dress, with good foundational techniques included.  But I didn't do any of that.  I actually began with by creating a strapless tube dress in nude spandex.  From there I began layering various fabrics and trims we found to create the final product.   
                  

I found this super cool fabric which was a heavily embroidered nude mesh fabric with what I referred to as "fish scale" sequins. I also found some gold lace thread appliques that I felt would make some nice accents.  While my daughter found some beading, and gold rhinestone chains for some added embellishments.  I chose to add a side zipper knowing that the two non-stretch fabrics were going to make it difficult to get into.  I layered the fish scale fabric on top of the spandex, only catching it in the zipper.  Then I began adding on the appliques....cutting them and pinning them to appear as if they were part of the original fabric.  

I cut off many of the fish scale sequins so they would lay around the appliques, all of which were hand sewn  to the "fish scale" fabric only.  

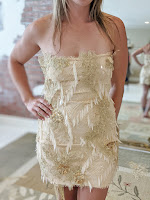
The picture to the left is after the first fitting.  The appliques are just pinned in place.   At the hemline you can see we had decided to add some gold faux rhinestone strands around the hemline.  

The beads I glued on using E6000 glue.  I was aware of that technique having sewn a few dresses for a competitive dancer friend of mine.  After I did created her gown, hundreds of beads were glued on. 

So that's my part sewing, part arts and crafts project that took me out of my comfort zone and turned out pretty darn good!                                                                                  


Sunday, July 3, 2022

ITALIAN BEEF SANDWICHES

 I spent the first sixteen years of my life in the Chicago area and northwest suburbs.  Not a tremendous amount of time, but long enough to have had the classic Chicago style Italian beef sandwich make an impact on me.  I mean how many could I have possibly had in that short amount of time?  But, I can still remember them....the flavor, the parchment paper wrapper, the juicy messiness....so yummy!

I've found some recipes online and first shared them with my family a few years ago.  I got that crazy craving just recently and made a huge crockpot full again just the other day.  Man oh Man!  Those beautiful aromas wafting all day long as the flavors slowly simmer together.  This one was slightly different than the first recipe and I enjoyed it even more than the first......so, fair is fair right?  I'm going to share it with you. 


INGREDIENTS:

1 (5 lb) rump roast or chuck roast
1 package dry Good Seasonings Italian dressing mix
22 oz. beef broth 
1 (16 oz.) jar sliced pepperoncini (drained)
1 (32 oz.) jar giardiniera (drained)
3-4 green peppers sliced into ¼ inch slices lengthwise
skinny Italian loaf sliced into sandwich size lengths


DIRECTIONS:

Trim excess fat from meat, cut into 3-4 large chunks and place in the bottom of the crock pot.  Whisk together the Italian seasoning and beef broth and pour over the meat.  Add the pepperoncini.  I chose to add 3/4 of the jar and then put the rest on the side for those who wanted a spicer sandwich.  Add in all of the giardiniera.  

Set the crockpot to low and let it simmer for 10-12 hours.  During the final 60-90 minutes, add in the sliced green peppers, submerging them into the juice.  

The meat will naturally break apart on its own while cooking.  Any larger chunks can easily be shred with a fork. 

Ladle up a good portion of the meat onto the roll, then spoon on some juice.  

Enjoy!


NOTES:
  • giardiniera comes in many varieties....I chose the classic, which is cauliflower, celery, carrots, pickles and pearl onions.  There is a "Chicago" variety which also includes hot peppers.  Also, you can choose from mild, medium, and hot.   Also, the only version of giardiniera I could find was the version with very large pieces of vegetables....I brought it home and used my food processor to chop it into small pieces. 
  • I ended up with a lot of meat juices in addition to the broth that I had already added.  You may need to add additional flavoring to your liking.  I added in some black pepper, oregano and basil.  
  • the true Chicago style sandwich does not include cheese, but I chose to put some shredded "Italian blend" cheese on the side for folks to sprinkle on top if they wanted. 
  • This freezes well....and, I'm going to look forward to some sandwiches this fall/winter while watching Sunday football!

Monday, June 20, 2022

MILLIONAIRE SHORTBREAD

 I've been wanting to try this recipe for sometime now.   Frankly it looked like a lot of work.... and it was a considerable amount of work... but the work paid off.  These babies are awesome.  

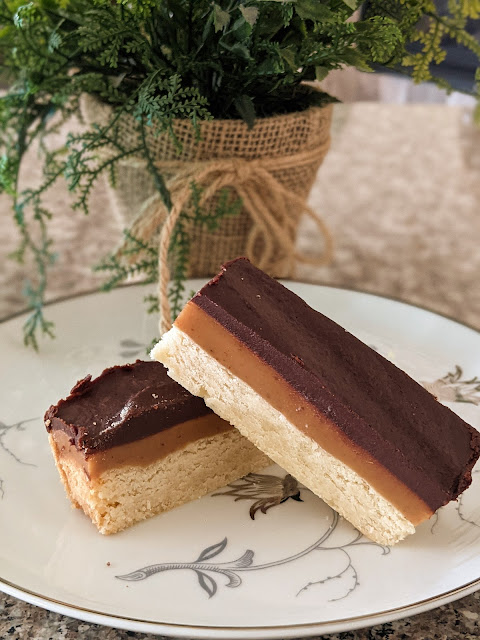
Three layers of goodness.  A shortbread base, caramel center and chocolate ganache topping.  And yes, each of these steps take some time, so it's not a cookie you'll be making on a regular basis for sure, but like I said it's worth the effort.   Super rich (reminded me of a twix bar), so you can't gorge yourself on these.  You'll be happy to know that the recipe uses a 9x9 pan, so that's also a good thing because you don't want a lot of leftovers.

INGREDIENTS:

2 cups all purpose flour
1 cup unsalted butter, room temp
½ cup granulated sugar
1 egg yolk
1 tsp. vanilla extract
½ tsp. salt

CARAMEL:

1 14oz. can condensed milk
½ cup unsalted butter cut into tablespoon size pieces
1 cup light brown sugar, packed
¼ cup light or dark corn syrup
1 tsp. vanilla extract
½ tsp. salt

CHOCOLATE GANACHE:

1½ cups semi-sweet chocolate chips
1/3 cup heavy cream
1 pinch sea salt to sprinkle on top (optional)


DIRECTIONS;

Preheat oven to 350 degrees and line a 9x9 inch baking pan with parchement paper or foil, leaving an overhang to help with removal.

Cream the butter.  Then add the sugar and salt and beat until light and fluffy.  Add the vanilla and egg yolk then mix until combined.  Add the flour in a few batches and mix until just combined.  Transfer to your prepared pan and press into an even layer.  Bake at 350 for about 22 minutes or until the edges are golden.  

While the base bakes, make the caramel.  *This is easiest with a candy thermometer, but it's not required.    Combine the butter, brown sugar, salt, vanilla, condensed milk and the syrup.  Place over medium heat and whisk until melted and combined.  Continue whisking over the heat while the caramel bubbles and darkens to a rich color.  Once it reaches 225 degrees, you'll see it starts to thicken and pull away from the edge, 5-6 minutes.  Your caramel is ready.  

Pour onto the shortbread base.  Smooth to the edges creating a flat layer.  Chill for about 10 minutes so the caramel sets.

Melt chocolate chips and cream either in a double boiler or microwaving in 2-3 20 second bursts, stirring in between.  Pour the chocolate over the caramel and smooth into an even layer.  Sprinkle with salt if desired then chill and cut into pieces. 


Notes:
* I do not have a candy thermometer and did just fine.  The instructions were written well and it was easy to follow along to know when it was ready

It's essential the butter is at room temperature for making the shortbread

When making the caramel, be sure you are stirring contantly, so it doesn't burn on the bottom.

The bars were super easy to slice because they were chilled.  I let mine chill for a good 30-40 minutes before slicing. 

Enjoy!


Wednesday, May 11, 2022

PUMPKIN CRANBERRY MUFFINS

 What do you do when you find you have a can of pumpkin which is close to expiring and some craisins that are getting pretty stale?  Well, you find a recipe for pumpkin cranberry muffins, of course!

The one I found is pretty darn good.  The batter is thicker, so you can really fill up the muffin cups and they're not too sweet.  Plus, the recipe makes just 12 so you don't have tons of these puppies calling your name when you're watching TV in the evenings.


INGREDIENTS:

2 cups flour
½ cup packed brown sugar
1 tsp. baking soda
1 tsp. cinnamon
½ tsp. nutmeg
½ tsp. salt
1 cup pure pumpkin
*1 pkg. (6 oz.) craisins dried cranberries
½ cup oil
¼ cup milk
¼ cup molasses
1 large egg

DIRECTIONS:

Preheat oven to 350 degrees.

Combine flour, sugar, soda, cinnamon and nutmeg in a bowl. 

Combine pumpkin, craisins, oil, milk, molasses and egg into a separate bowl.

Add the wet mixture into the dry ingredients, mixing just until everything is moist. Spoon batter into the cups about 2/3 full (or since the batter is dense, fill them a little fuller and just plan on making 10 muffins like I did)

Bake for *30 minutes.  Let cool for 5 minutes before devouring. 

NOTES:
*since I was at the bottom of one of the huge Costco bags of craisins, I used 1 ½ cups.

* I don't ever recall a muffin recipe with a cook time of 30 minutes.   I went with 22 minutes, which still seemed long but I thought the extra time might have to do with the consistency of the batter.  Mine were finished at 22 minutes and were very moist. So, I'd suggest a cook time of 18-22 minutes.

Enjoy!

recipe adapted from:  www.verybestbakinglibbys.com

Friday, May 6, 2022

CUSTOM WEDDING GOWN

This post is a long time coming since it has to do with a custom gown that I created in 2020 for a Spring 2021 bride.  As we all know, 2020 and 2021 were difficult, turbulent, stressful, and unfathomable for everyone.  But when it came to couples who were hoping to get married during those years, it was a never ending nightmare!

I actually had three brides/custom gowns I was working on in 2020.  Two of those brides I've been able to post about since somehow, someway, they were able to sneak their weddings in during that year.  It took lots of modifications, sacrifice, planning and re-planning, but they did it! 

My third bride and her fiance' had their hearts set on a 2021 spring wedding in Telluride.  And unfortunately, they just couldn't have the wedding of their dreams even by March of 2021.  There were so many restrictions still in place, that they decided to postpone for another full year so that they could host the celebration with family and friends that they really wanted to have.   

Andie had already tried on a gown that she really liked, but came to me to see if I could create something similar, but with a few custom features.   And that, as they say is how it all began.......    

Fit was essential since this was a fit and flare off-the-shoulder style gown with a super long train.  I took every conceivable measurement and then went to work creating the actual pattern pieces.  As always a simple muslin was created to check the fit, before I cut into the fashion fabric.   Critical to the fit were two of the custom design features.  1) the flare had to be enough to allow her to ski board into the ceremony.  Yup!  You read that right...both she and the groom would be making a grand entrance to the ceremony site and their waiting guests.  2) while she loved the off-the-shoulder design, she was hoping that I could create something that would allow her more flexibility/freedom than the typical off-the-shoulder allows.  This was not only based upon the "ski-in" requirement, but she expected to fully party at the reception and wanted more "range of motion" than she was getting.   The third requirement, while not fit related was also critical to her arrival.....I had to find a way that she could hold/carry and/or bustle the train.  
                           
The fit worked out beautifully.  My pattern pieces were very oddly shaped, but that was critical to get the bodice to hug her gorgeous figure.  And yet, below the knee it flared to the extent that she needed.  As for the "shoulder straps"....I gave them a bit more drape so that she could slip her arms out of the straps completely.  I then had some hidden hook and eye fasteners on the back of the gown which allowed them to stay in place (almost like a bustle for the train).  

Finally, I made a long strap and attached it on the underside of the train which would allow her to hold up the train while she was boarding.  And for the reception, I created a pretty bustle.   In case, you're wondering, there are 100 pearl buttons hand sewn down the back of the gown. 


I'm so thrilled to have received some professional pictures from the big day so that you can see how beautiful Andie looked on her special day.   Unfortunately, I don't always get pictures from the actual day, so I've learned to take a lot of pictures along the way.  
 

Isn't that amazing!  You can see how she slipped her arms out of the straps to board/party, and has her arms inside the straps for the portraits/ceremony.  They had an absolutely gorgeous wedding weekend (I was watching the forecast).  The weather was bright and sunny so they could have their outdoor ceremony and take some gorgeous portraits.   It also sounds like many of the guests arrived early so they could get some skiing in with the bride and groom ahead of the actual wedding day.

I'm so honored to have created Andie's gown.....she was an absolute peach to work with.  My very best wishes go out to the newlyweds.  May you enjoy a long, happy and healthy marriage!