Search This Blog

Pages

Monday, July 29, 2013

DINING ROOM SHEERS

This project was long overdue.  For years, I had  pleated cellular shades in my living room/dining room.  In the time that I've had them, I've had to replace the cord on the living room shade and totally replace a panel in the bay window dining room since it tore.   Since then I had another panel that the cord was pulling the shade up on one side only and a second panel that tore.  REALLY????  ......and these things aren't cheap!  So, I decided I was done and needed to switch things up a bit.
       Before                                                      AFTER                                  
I apologize for the quality of the pictures.  It was tough to capture this correctly due to all the back lighting.
In the picture on the right you can see how the shade tore....what an eyesore!

When I was considering what I wanted to replace the cellulars with I had to consider that it was rare for us to open the two middle sections since it looks right into our neighbor's windows.  If we did open them at all, it was only halfway so that we could pop the window open and get some ventillation.    I knew I wanted some privacy, but I also didn't want to totally darken the room.  So, I opted for sheers; lightweight yet opaque so from the outside you can't see in at all.   Classic, yet fresh!

While I was at it....I decided to ditch the brass look of the swag fixtures (oh and the stencilling is going to go in the next couple of weeks).
I had made the scarf valances years ago and still liked them, so I got lucky and found a great color match at a recent sale at JC Penney and bought the sheers.

The living room was a breeze; I bought three panels (50") and the length of 84" worked great.   For the dining room, I bought five panels, but the 84" was going to be too short and the 103" was too long.  So, that was the only drag of the project.  I ended up cutting eleven inches off each panel and then hemmed them by machine.
To change up the brass look....I used a two step antique spray paint; the bottom layer is a matte gold and the top layer is antique white, which crackles as it dries...the more coats you add of the top layer, the deeper the cracks.  It makes the brackets much more subtle.
So there you have it....this was step one of  the ongoing transformation I plan  to continue to make in the living room/dining room of our home.

Sunday, July 14, 2013

CUSTOM MADE BRIDAL GOWNS


I decided to open a store on Big Cartel to sell some of my ready-made designs, as well as offer custom made design work.  It's a small shop; featuring five products although I have the ability to grow the store if/when the business expands. 

I'm excited to get back to my first love of design, patternmaking and sewing on a grander scale and look forward to what the future may hold.  My all time favorite type of work is anything and everything bridal related from small items, such as:  garters, veils, ringbearer pillows....to flower girl, bridesmaid and my ultimate favorite, one-of-a-kind bridal gowns.      

If you haven't done so, please visit my  website or my facebook to see what SheaMarie Designs has to offer!

Tuesday, July 9, 2013

RE-PURPOSED CHAIR

So I did it...I went back and found myself an old dining room chair from the thrift store.  Sad, though it was...I could see the potential!
BEFORE
First things first....I needed to pull up the old upholstery fabric and add some new.   It would be interesting to know how old this chair really is, because when I pulled off the outer layer of fabric, there was another layer beneath---this chair had already been re-upholstered once in its lifetime.  Time for another face lift and while I was at it, I decided it needed some additional padding, what was there was pretty worn.  Eureka!! I knew just the fabric that would turn this chair into a beauty and it was in my existing supply of fabric!
AFTER
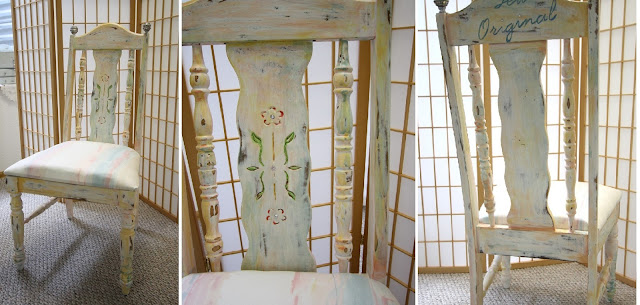
After taking care of the re-upholstering, it was time to sand the chair.  I wanted to distress it similar to the distressed cabinet I did last year; different color, but the same process.   What was extra cool was I used several colors of old paint.  You know those gallons/half gallons that you have stashed in the garage and basement that are leftover from the other painting projects in the house?  

After I had roughed up the stain and finish, I painted the entire chair off white...I needed to give it a good light colored base to build on.  After that, I used terra cotta, pale green, gold and light blue to make it look like it had been re-painted many times over the years.  I diluted each of the colors with water as I was painting since I wanted the colors to be muted.

After the painting, I went back at it with the sander to make it look worn and beat up.  There's no formula....you just go for it to get the look you want.

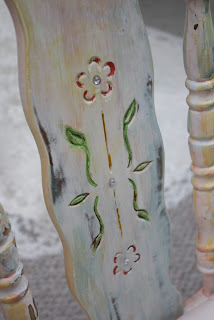
I filled in the flower and leaf motif on the chair back using craft paints; not too much, just here and there--so that it looked worn with age.  Finally, I added a few "diamond" stickers to the center of the flowers for a bit of glitz.
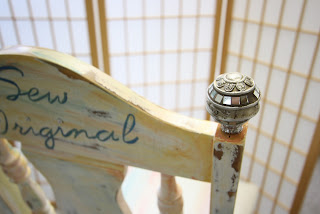
I knew I wanted to swap out the finials at the top of the chair and decided to pick up a couple of drawer pulls at ...... none other than Hobby Lobby!   They were 50% off.  woo hoo!   I pulled off the old ones and drilled deeper holes (well, actually my husband did---thanks babe) since the drawer pulls have extra long screws...add a dollop of glue for added security and you're good!

My final touch was to add the words to the back of the chair.  I found a font that I liked and typed "Sew Original" (little play on words) out on the computer and printed it....I then used the old trick we all learned in art class in middle school and scribbled with a pencil on the backside of the paper and turned it over and traced over the lettering to transfer the words (do-it-yourself carbon paper).  Then I used markers to color in the lettering.  Two coats of spray finish (matte) over the entire chair to set the paint and I was done.  So that's it!  I love it....the chair looks awesome with my new sewing table.  I love the transformation that has taken place in my sewing studio.  It's fun...bright and all me!

Total cost $7.00 plus tax (the chair cost me $2.99 and the drawers pulls were $4.99)


Monday, July 1, 2013

RE-PURPOSED TABLE

I've been looking for a sewing table ever since I purchased my serger; with two machines and only one sewing table, I had to make do by pulling the card table out of the storage closet.   I never did like the sewing table...but add the card table to it and what an eye sore.   It was functional - but downright ugly!
Anyway, I certainly didn't like the prices of some of the sewing tables that you could find online, some upwards of $800-plus they were really big with lots of drawers and such and I was looking for something simple.  I started checking out Craig's list and other online sites for either a table or desk that someone wanted to sell or donate.   I decided to run into the ARC thrift store a couple Saturdays ago (remembering Saturday is 1/2 off day) after I made a donation myself and lo and behold, there was an old kitchen table calling out to me.   It had some fun spindle legs like I wanted and a wood top, it was nice and long; plenty big enough for two machines; possibly three...easy to move my chair around from machine to machine.  In fact, the more I thought about it, I could also use it as a cutting table when needed and avoid hauling all my goodies up to the dining room table, or using the floor....I knew with some TLC, I could fix this baby up!  And how can you beat a $59.99 sticker price?  So, that meant $30.00!  Really???
ewww...yuck!
Man, I had no idea what I was in for....once I got this sucker into the garage and started looking closely at it....this was going to take some serious elbow grease.  It was disgusting actually.  It looked like the table hadn't been cleaned in years.  I believe I could identify peanut butter and Hershey's syrup and yes, there was also gum stuck underneath the table.  There were so many other stains and old food - it was Gross!

After approximately 90 minutes, Mr.Clean and I had finished and uncovered a table that I could definitely work with.   It had a nice butcher block top that needed to be sanded to remove the larger gouges and are those really fork marks?  I definitely need an ultra smooth table which can't snag any fabrics that I'm working with. The clean up and multiple hours of sanding took all of Day One--I was whooped.  That impromptu trip to the thrift store and subsequent project, was in between my other Saturday chores.
BEFORE
Day Two -- I knew I  wanted to give it some character like some of the other pieces that I've added to my sewing studio.   I had some ideas floating around in my head that involved Mod Podge, craft papers and paints, but once I got going other ideas just unfolded as the project evolved that called for buttons, ribbons and sparkles.  What a gas!  My husband would come out to check on me periodically and just shake his head.
AFTER


After the decorating was finished, the top was sanded a few more times, then I decided to use wood wax  versus any type of varnish or shellac for the finish (that was my husband's idea).  It added a natural luster,  without any residue.  You rub it in and buff with a clean cloth; my husband did this for me (thanks babe)...he added three coats. I am so pleased!  It's functional and fun and is everything I hoped for....
 
Now, in the weeks to come, it's another trip to ARC to drop off the sewing table that I've always disliked and see if I can find a chair that I can re-purpose and ditch the folding chair.  Can't wait!  (ssshhh...don't tell my husband)