Search This Blog

Pages

Friday, July 27, 2018

PALLET SHELF

While I can't take credit for the design (I found something like it on Pinterest), I'll take credit for the "find" and how absolutely adorable it looks in my daughter's powder room.
This as you can see, is made with an old pallet.  My husband gets the credit for the muscle.  He's the one that deconstructed the pallet, cut the boards to the length I wanted and cut the shelves.  There's something about when power tools are involved that he just prefers to do it himself.  Go figure.
I on the other hand, get the credit for the painting and the chotchkies  decorator items.

Once the pallet was dismantled and reassembled.  I lightly sanded it to remove some of the splintered edges, but I wanted to maintain as much of the distressed look as I could.   I even strategically placed the wider board on the outside since it still had actual bark on the edge which looks really cool.

Once that was done I painted the boards with white paint.  I added some water to create more of a white wash.  Then added light touches of blue and green (since those are her accent colors).  Her bathroom was just recently painted a light sage green, so it looks really pretty against it.

The best thing about this project?  The entire unit was constructed at no cost.  The pallet was retrieved from a building site.  The shelves were constructed with old boards we had in the garage, and the paint we already had as well!

I found the majority of the knick-knacks at Hobby Lobby on sale and/or clearance.  So with a little bit of labor (but, mostly love) and minimal cost, this pallet shelf makes for a sweet accent piece!                                                                 

Tuesday, July 17, 2018

VINTAGE WINDOW

Ever since seeing some pictures of vintage windows used as home decor, I knew I wanted to try my hand at it.  As it turns out, the perfect opportunity arose when my daughter was interested in one for her new guest room.

I purchased my window from Uncle Benny's in Loveland, Colorado.  It's a great resource for old and new building supplies at very reasonable prices.  They charge $5 per pane for old windows.  I chose to purchase a single pane window and made my own panes; not necessarily for the cost savings, but I didn't see any windows in the size that I was looking for with four panes.
I really didn't do much to the window itself other than hose it down and clean it up just a bit.  I chose not to do any additional sanding since 1) I figured it was lead based paint, and 2) I truly thought it already had all the character it needed.

So, I went to my local big box hardware store and bought a four foot piece of ½" moulding and painted it brown, followed by a top coat of white.  I left sections of the brown showing through in places and scuffed it up in other places to give it that weathered look.

With a little help from my husband, the moulding was cut to the proper dimensions and I hot glued the (3) pieces to the window itself.   I have to say, I'm tickled with the way it looks; I think it's a fine imitation of a four paned window.

To add some additional character, I found a couple of antique brass hooks at Hobby Lobby and placed one on either side of the frame.   As you can see, we hung a straw fedora from one of the hooks, along with some silk hydrangeas (to match the color scheme of the room) and greenery and it's a cute little wall hanging which is displayed on the wall just as you enter the guest room.  So cute!

My husband thinks the window may be pushing 100 years old due to the way it's constructed..oh, if this window could talk!  Can you imagine the stories it could tell?

Saturday, July 14, 2018

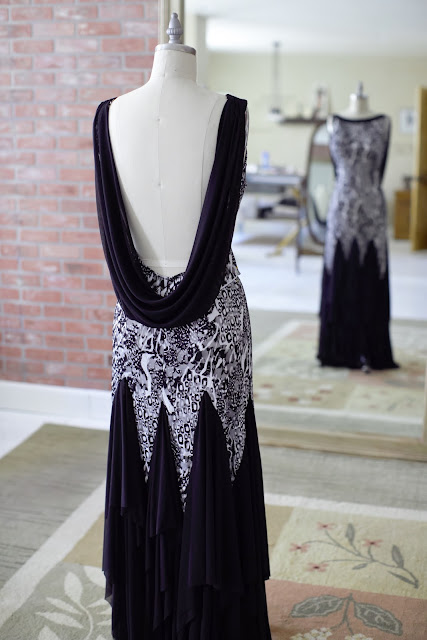
COWL BACK BALLROOM DANCE GOWN

This is the second dress I've made for my good friend Daneen.   I love this gown, it is so elegant and it looks fabulous on her (unfortunately, dopey me forgot to pick up the camera and get some pictures of her in it at the last fitting). 
This is the last picture I took.....before I added the panties, the back straps and the horsehair trim in the hem.  Once I put the "panties" into the dress, I can no longer get it on my dress form to take more pictures.
This is the beginning process...just after I finished the pattern work. In this case, Daneen only had so much of the black/white fabric and we were worried that we'd have enough.  But, I was able to puzzle piece the pattern pieces in a way, that the yardage she had was just enough!

As far as the pattern work was concerned, I used the skirt from the first gown I made her and just had to modify the bodice.  This gown is a jewel neckline with a deep scoop back and a beautiful cowl drape.   Whenever I work on one of these gowns, I have to keep in mind not just the design elements, but the technical aspects of the gown as well.  While we want it to look beautiful, we also need to ensure the logistical components.  For instance, the drape has to be tacked in places to keep it from flying too much and eliminating any possibility of her partner's hands getting caught up in it.

I drew some lines on the picture to the right so you could see where we placed the back straps.  Daneen has a beautiful sculpted back, so this open back design really showcases it perfectly. 

After I finish my work, Daneen adds all the bling to the gown.  It's quite a process gluing on all the rhinestones and beads, but it looks so gorgeous when it's finished...and is quite a sight on the dance floor!

I'll have to add a few more pictures to this post once it's beaded and ready for her fall competition.

Tuesday, July 3, 2018

CRANBERRY ORANGE SCONES

This effort came from the need to use some craisins before they got really stale.  You see, I buy the industrial size bag at Costco and use them mainly on my salads, so by the time I get to the bottom third of the bag, they're getting a bit firm.

So being the scone lover that I am, I knew I could find a recipe for cranberry scones.....and this one turned out to be as yummy as I had hoped.
There are times when I need something sweet, but not too over the top and to me, a scone fits the bill.

INGREDIENTS:

3 cups Bisquick baking mix
½ cup orange marmalade
½ cup craisins
½ tsp. cinnamon
¼ tsp. nutmeg
2 eggs
1 Tbsp. orange juice

Sugar Coating:
¼ cups sugar
1 egg beaten

*optional drizzle

DIRECTIONS: 

Combine Bisquick, marmalade, cranberries, spices, 2 eggs and juice until moist.  

Turn dough onto a floured board, sprinkled with flour.

Roll into a 9-inch circle.  Cut into 8 wedges using a floured knife.  Place on a parchment lined baking sheet.  Beat the third egg in a small bowl and brush on the scones.  Sprinkle with sugar.

Bake at 400 degrees for 12-14 minutes.  Allow to cool.  I chose to make a powdered sugar drizzle using OJ as my liquid. 

NOTES:  Next time, I'm not going to make my circle as large, since I want my scones to be a bit taller.   I also recently read another recipe that said to slice into wedges, but not separate.  I'm thinking that will also make them a bit plumper.   Finally, I want to pick up some decorator sugar crystals so the sugar coating looks and tastes even better!

I put the leftovers in a freezer bag, and re-heat as the mood hits me.  

Enjoy!

recipe c/o:  www.onceamonthmeals.com