Search This Blog

Pages

Monday, November 16, 2015

HOME SWEET HOME SIGN

It's always fun for me to make a house a true home, by decorating it to reflect our personalities.   Having just moved into a new home, my creative wheels are spinning.  We still have a lot of boxes and furniture in storage, so it will be like "Christmas" for me when we do get a chance to unload those items (we have to finish the basement first)!

In the meantime though, there are a few projects I've been working on along the way.  This first one was super simple, but adds a really nice touch to the built in coat rack we have in our house.
 It's a little tough to capture this particular spot in pictures since it is in the corner of the entryway from the garage, which is a bit dark.  So I apologize for the shadows being cast on the sign.

Being in an area with new construction, there are many dumpsters throughout our neighborhood and the craftsmen are always discarding things.  I rummaged through their discard pile the other day and found this roughed up piece of wood and brought it home.  It was just what I needed for my sign!

I sanded it just a smidge so that that vinyl would adhere nicely, but left the weathered and splintered edges as is.  I made the sign using my Silhouette machine and this project was finished in just about an hour.

To finish it, I painted two light coats of ModPodge on top of the letters when I was finished to give it some additional protection.....and there you have it!   It's just what this little corner of "our world" needed.

Monday, November 9, 2015

PEANUT BUTTER CHOCOLATE HEAVEN

What could be better than peanut butter and chocolate together in a "no-bake" recipe?  Is that crickets I'm hearing.....that's what I thought.

This dessert is so tasty!  I recently made it for a family gathering and decided to double the recipe since we are dessert lovers.  Let me tell you, the 9 x 9 version would have been plenty big enough.  It is rich and loaded with flavor, so a small piece is just right.    I'll be sharing the "original", which will satisfy approximately 6-8 people.

INGREDIENTS:

20 Oreo cookies, divided
2 Tbsp. butter, melted
1 pkg. (8 oz.) cream cheese, softened
½ cup peanut butter
1 ½ cups powdered sugar, divided
1 carton (16 oz.) frozen whipped topping, thawed and divided
15 miniature peanut butter cups, chopped
1 cup cold milk
1 pkg. (3.9 oz) instant chocolate fudge pudding mix

(Obviously, you can "lighten" this recipe up on both the calories and the guilt, by using low fat versions of several of these ingredients...it's totally up to you!)

INSTRUCTIONS:

Crush 16 Oreo cookies until coarse.  Add the melted butter and press into the bottom of a 9x9 inch pan.

In a large bowl, beat the cream cheese, peanut butter and 1 cup powdered sugar until smooth.     Fold in half of the whipped topping and spread over the Oreo crust layer.  Sprinkle with the chopped peanut butter cups but reserve some to sprinkle on the top.

In another bowl, beat the milk, pudding mix, and remaining ½ cup powdered sugar on low for about 2 minutes.  Let stand for two minutes.  Fold in the remaining whipped topping.  Spread on top of the peanut butter cups.  Sprinkle the top with the remaining crushed Oreos and peanut butter cups.  Cover and chill for 3 hours before serving.  

Thanks to: The Recipe Critic for the recipe!


Sunday, November 1, 2015

CHRISTMAS TREE SKIRT

A little birdie dropped a hint last Christmas that she hoped Santa would bring her a Christmas tree skirt.  Unfortunately, when the hint was shared, their tree was already up and time just flat ran out for me to create something.   So, Santa filed that hint away for this Christmas.   And now, I can gift it early to make sure it's ready for this holiday season.
I found a cute neutral cotton fabric for the skirt itself and decided to give it a splash of  color by using red seam binding to finish the top and bottom edges, as well as red felt poinsettia flowers on the front of the skirt.

If you've never made a tree skirt, it's so simple.  Let me share some of the tips and tricks.  First, once you find your fabric (you'll need about 1 ½ yards since most holiday cottons are about 45" - 54" wide) you'll fold it in half and then in half again to make a square.  You'll have a bit leftover which you can use to make the ties for the back of the skirt, and place the rest in your remnant bin for another project!

I made 3 sets of ties
The circumference of the skirt is totally up to you.  I chose to make mine pretty large since my daughter and her husband have a really tall tree.   What that meant was I measured 26" down the fold and 26" down the opposite raw edge of my square and continued marking 26" from my corner point to make the "arc" for my cut line (there are some really good You Tube videos if you'd like an actual visual tutorial on the process, just google Christmas tree skirt).   It will also show you how to cut the circle for the tree base and create a center back seam.

To finish the center back seam, I used a simple rolled edge hem....and made ties from the same fabric to tie it together at the back of the tree.  

The poinsettias are made from red felt....frankly, this was just eyeballing and cutting three different size petals and hot gluing them to a felt circle.  For the two larger petals I used a total of 10; first I glued down 5 petals, then went back around adding the other 5 in the voids created in the first row of petals. The smallest petals I only used a total of 5.  To create the center, I placed a dollop of fabric glue and sprinkled gold glitter on top.

I made a total of 5 poinsettas; 2 large, 2 medium and 1 small.  Once I had placed them on the skirt (about 8 different ways before I made my decision), I hand sewed them into place.
I think now that I've made this one for my daughter....I need to make myself one! I have this cheapy red felt skirt I bought years ago and every year when I get ready to put the tree up, I vow I'm going to make myself a one-of-a-kind skirt to replace the generic one I have.  Who knows, maybe it will be this year?

Friday, October 23, 2015

DARK CHOCOLATE SALTED CARAMEL OREO PIE

This is by far the richest, and sweetest dessert I've ever made.  I mean....it's almost too sweet, if there is such a thing.  My daughter said her teeth and gums hurt eating it!  I would recommend when slicing it, make the portions at least half of what you would normally cut.  I'm serious.
I wanted to make a birthday dessert for my Son-in-law....not a cake, but something more decadent.  In searching, I landed on this one by: Kevin & Amanda's Recipes

INGREDIENTS:
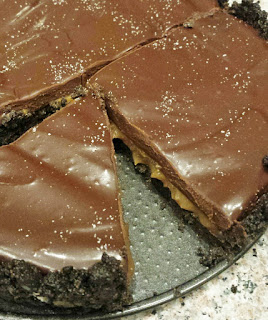
WARNING!!! : this slice is way too big

1 package (about 36) whole Oreos
1 cup (16 Tbsp.) butter, divided
2/3 cup packed brown sugar
1 ¼ cup heavy whipping cream, divided
1 (12 oz.) bag dark chocolate chips


DIRECTIONS:

1.  Finely crush the Oreos with a food processor or blender.  (I used the rolling pin in a freezer bag trick) Stir crumbs together with 8 Tbsp. melted butter until well combined.  Press into the bottom and sides of a pie pan.  Freeze crust for 10 minutes until set. 

2.  Combine the remaining 8 Tbsp. butter and brown sugar in a small saucepan.  Cook over medium heat, whisking constantly, until mixture begins to bubble.  Continue cooking, whisking constantly for 1 minute.  Remove from heat.  Slowly whisk in ¼ cup heavy whipping cream until smooth.  Cool caramel about 15 minutes.  Pour the caramel over the crust, then return to freezer for about 30-45 minutes; until just chilled and set.  (You don't want the caramel to fully freeze)

3.  Place the chocolate chips in a glass bowl.  In a saucepan, bring 1 cup heavy whipping cream to a simmer over medium-high heat.  Pour the cream over the chocolate chips and let sit for 5 minutes, then whisk until completely smooth.  Pour the chocolate over the caramel and freeze for a final 30 minutes, until just chilled and set.  OR, refrigerate, covered until ready to serve.   Before serving sprinkle the top with a flaky sea salt like kosher salt or Fleur De Sel. 
YES!!  This is a much more palatable portion

(I used a springform pan versus a pie plate...the recipe also suggested a torte pan would make for a pretty fluted crust)

Tuesday, October 20, 2015

HIGH ALTITUDE PUMPKIN BREAD

Since it's starting to feel a bit like Fall around here, I thought it was time to do some baking.  Now, I've never been a fan of pumpkin pie, but give me a pumpkin muffin or piece of pumpkin bread, and I'm happy!
It's always nice to land on a proven High Altitude recipe, keeping the guess work out of the equation! This one turned out beautifully, making two loaves....one for now, and one for the freezer.

INGREDIENTS:

3 eggs
2 cups sugar
½ tsp. vanilla
1 ¼ tsp. salt
¼ tsp. baking powder
3/4 tsp. nutmeg
3/4 cup vegetable oil
2 cups canned pumpkin puree
3 cups flour
1 ½ tsp. baking soda
1 ½ tsp. cinnamon
½ cup chopped nuts (optional)
½ cup raisins (optional)

DIRECTIONS:

Preheat oven to 350 degrees.  Beat oil, sugar, and eggs in a large bowl until light and fluffy.  Add vanilla, and pumpkin, mix until well blended.

Sift flour, salt, baking soda, baking powder, cinnamon, and nutmeg.  Add to pumpkin mixture and beat on low speed until blended.

Stir in nuts and raisins if desired (I used walnuts and golden raisins).  Pour batter into two 9x5 inch loaf pans that have been sprayed with cooking spray.

Bake for 60 minutes or until toothpick inserted in center comes out clean.

Remove bread from pans and let cool on rack.  

I chose to make a cinnamon glaze, using powder sugar, milk and cinnamon.  

So good.....enjoy!

Thanks to:  High Altitude Country Kitchen Volume 1

Sunday, October 11, 2015

TULLE FLOWER GIRL DRESS


This project was such a treat for me.   Not only was I able to help a bride with her garter set, flower girl basket, and ring bearer sign, but I was also asked to create the flower girl dress.  Especially sweet since this little flower girl was the eighteen month old daughter of the bride and groom!

The bride knew she wanted a dress that would match her lace overlay gown well; she had a full tulle skirt in mind; she wanted it to have a touch of the bridesmaid color (pewter) somewhere in the design; and finally, she also knew she wanted to incorporate some pieces of her gown into her daughter's dress in some way.
 As we chatted over coffee, I sketched up the design, making notes of the "must haves" along the way.   I suggested a lace overlay bodice with the tulle skirt.  I would add a rhinestone neckline to match Mom's rhinestone belt, and I could make a fabric flower on the front of Ms. Madison's dress and use the remnants when the bridal shop hemmed her gown.  As for the pewter touches, some beading and ribbon roses would add just the right amount of color without overpowering Madison.

Oh....and I couldn't let the dress out the door without a matching lace headband!

Madison did such an awesome job on the wedding day, and her little cowgirl boots were adorable!

Special thanks to www.kbdigitaldesigns.com for the precious pictures of Madison.


Sunday, September 27, 2015

RINGBEARER SIGN

I created this sign with a one year old ring bearer in mind.  I knew it would be helpful if I could make his role in the wedding as easy as possible; after all he needed to concentrate on the new art of walking that he had recently learned!

Knowing that the bride was looking for a rustic sign to blend with the theme of the wedding, I found a scrap piece of wood in the garage and cut it down to a manageable size for a one year old (well actually, I let my husband help with that part).   I also made the sign "hands free" by creating a twine hanger that would allow him to wear it around his neck while he walked.
The bride knew that she wanted "Here Comes the Bride" on the sign, I suggested we add another look to the reverse side.   I could create an "established" sign for them with their surname. 
 I suggested the sign could be flipped around on the ring bearer (for the recessional), then after the ceremony. it could be used at the reception (on the gift table, the head table or the guest book table) and finally after the wedding, they could use it for decoration in their new home.  So instead of using it only once, they could enjoy it for years to come!

I painted a white base coat on both sides of the sign, then added a top coat of a blue grey over that. To give it a distressed look, I sanded to remove some of the paint.  The lettering was done on my silhouette machine using black and grey vinyl.

Once the lettering was in place, I gave it a good coat of Mod Podge to seal and protect the surface.  For the edges, I used a narrow jute twine; wrapping it around three times.

I had hoped to be able to share pictures of the little ring bearer with his sign, but it didn't work out quite as planned.  Instead he was carried some of the way by his Momma, and when he decided to walk, he was holding the sign by the string and being so low to the ground it was tough to read the sign.  Oh well.....it was placed on the gift table after the ceremony and looked great among the gifts.